If you ever tried to install a brand new Sitecore 9.1 instance on a not that brand new server, especially if this server already has or had another Sitecore 9.0.x instance installed on it, chances are you faced one or more certificate issues while doing that. And let’s face it, we all know that those problems are the worst since they smell like wasted time…
After installing more than thirty different Sitecore 9.x instances in the last few months and having a lot of issues with those little boys, I came up with this list of the three most common certificate issues and I’m going to show you how to fix them in this blog post.

But before jumping on the list, let’s start by understanding the expected outcome when it comes to the Sitecore 9.1 certificates. Basically, after installing a fictitious new Sitecore instance named coveoticore you should have the following scenario:
Local Computer Certificates
- Trusted Root Certification Authorities:
- DO_NOT_TRUST_SitecoreRootCert with private key
- Personal:
- One certificate for your xConnect website issued by DO_NOT_TRUST_SitecoreRootCert
- One certificate for your Identity Server website issued by DO_NOT_TRUST_SitecoreRootCert
Current User Certificates
- Trusted Root Certification Authorities:
- DO_NOT_TRUST_SitecoreRootCert with private key
- Personal:
- DO_NOT_TRUST_SitecoreRootCert with private key
And more often than not, if you have or had a Sitecore 9.0.x instance and used SIF to install it, chances are you have a self-trusted root certificate that was created without a private key as mentioned here and here. Besides that, it looks that there is a mess about the place it creates the root certificate and then the place it tries to use it. That’s why you should aim to have the right root certificate on both local computer and current user stores as I mentioned above.
Most Common Errors You Will Find…
1. The Sitecore Instance Certificates Are Not Well Configured
If you are 100% sure that the certificates you have are valid and still your website won’t load properly, maybe it’s a matter of re-configuring them on your website configuration files.

Make sure you have the right xConnect and Identity Server certificate thumbprints in hands. You can find those values by opening the computer certificates manager, double-clicking on your certificate and going to the details tab.
Then, replace the old xConnect Certificate Thumbprint by this new one on the following files:
.sc\App_Config\ConnectionStrings.config.xconnect\App_Config\AppSettings.config.xconnect\App_Data\jobs\continuous\AutomationEngine\App_Config\ConnectionStrings.config.xconnect\App_Data\jobs\continuous\ProcessingEngine\App_Config\ConnectionStrings.config
Then go ahead and do the same for the Identity Server Certificate Thumbprint and replace it on the following file:
.identityserver\Config\production\Sitecore.IdentityServer.Host.xml
After doing that, double check if the certificates you have on IIS for the above websites are the right ones. Open IIS, click on the Server Certificates button, then find the certificate you want and open it to see the thumbprint. If they are not correct, delete the wrong ones and import the right ones using right-click then import.

2. The Sitecore Instance Certificates Was Not Issued By A Valid SitecoreRootCert
That can happen if you realize the Sitecore instance certificates (xConnect and Identity Server) were generated using a self-trusted root certificate that: a) don’t have a private key b) was deleted, maybe by you while trying to fix a certificate issue… yeah, I did it.

If that’s that case and you already have recreated the root certificate, you just need to recreate the website certificates as well and then reconfigure them as I showed to you on scenario 1. Otherwise, start by fixing the root certificated (scenario 3) and then get back here to do the second part of the job.
Start by deleting the xConnect and Identity Server from the certificates store. My two cents they are on LocalComputer/Personal.

Secondly, get the thumbprint of your brand new SitecoreRootCert which has a private key on it.

Since the Sitecore community loves so much PowerShell (me included) we are going to use it to generate our new website certificates.
Run those command in a PowerShell terminal. Make sure you replace the ID below by the one you got in the previous step.
# Make sure you change those parameter values
$NewCertName = “yourwebsitename”
$RootCertID = “C726867D3E81E4C0578AAC0FE6359837D034B818”$NewXConnectCertName = “$NewCertName.xconnect”
$NewIdentityServerCertName = “$NewCertName.identityserver”
$Signer = (Invoke-GetCertificateConfigFunction -ID $RootCertID -CertStorePath ‘Cert:\LocalMachine\Root’)
Invoke-NewSignedCertificateTask -Signer $Signer -DNSName $NewXConnectCertName,”127.0.0.1″ -CertStoreLocation ‘Cert:\LocalMachine\My’ -Name $NewXConnectCertName
Invoke-NewSignedCertificateTask -Signer $Signer -DNSName $NewIdentityServerCertName,”127.0.0.1″ -CertStoreLocation ‘Cert:\LocalMachine\My’ -Name $NewIdentityServerCertName
If you refresh your Local Computer -> Personal certificate store, you should see the two certificates you just created. Make sure you go back to scenario 1 and change the configuration in order to use these two new certificate thumbprints.
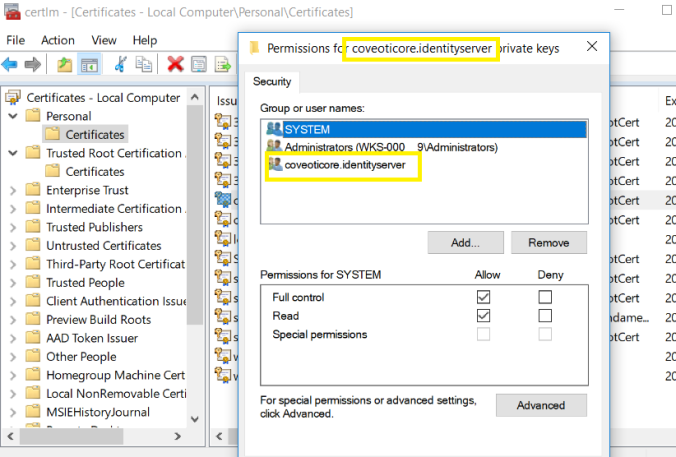
Then, on each one of those new certificates, do right-click, all-tasks, manage private key and make sure you give read access to the respective IIS Application Pool identities.

3. The Sitecore Self-Trusted Root Certificate Don’t Have A Private Key
Make sure the SitecoreRootCert has a private key on all the three locations expected as listed at the beginning of this article.

Delete every root certificate without a private key. Note that by doing that, all websites using client certificates which were generated using this broken root certificate will stop working. You should recreate those client certificates as soon as you have a new self-trusted root certificate with a private key. You can use the PowerShell script on scenario 2 to do this and then fix the configuration files and IIS settings as described in scenario 1.
If you have at least one SitecoreRootCert with private key among your three locations, you are lucky.

I’m happy to inform you that you can export it to a .pfx file and then import it on the other locations on which you deleted the broken root certificate you had. Do it using the right-click, all-tasks, import.
During the wizard to export the certificate, make sure you select the option to export it with a private key.

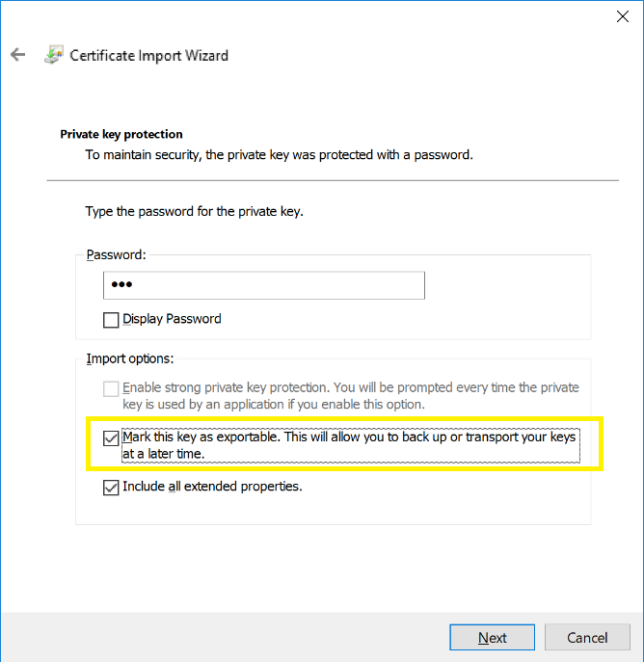
During the import, the most important thing is to select the option to mark this key as exportable, since this is required by SIF in order to properly install a future Sitecore 9.x instance.
And that’s it. You are all set when it comes to self-trusted root certificates.
If you don’t have at least one valid self-trusted, you can still create one using the following PowerShell script and then export and import it as I just described above.
Invoke-NewRootCertificateTask -FriendlyName “Sitecore Install Framework” -DnsName “DO_NOT_TRUST_SitecoreRootCert”
Conclusion
It can be painful, but it’s part of the game. Certificate issues are the kind of thing that we all know it’s about to happen, but we try to avoid as much as possible. At least now you know exactly how to fix it if it ever happens to you during a Sitecore 9.1 installation. I really hope that this article can help you in this case, and don’t be shy to reach out on twitter @hsantos_x if you find a scenario which is not covered here.