Showing posts with label sitecore-mvc. Show all posts

Tuesday, April 20, 2021

To get country/geo location of a user using C# MVC, client IP

 If you would like to know the geo location of the client who is visiting your website or to show some specific content based on visitor country/location then this article helps you.

To know the country name, we need to get the IP address of the user and check with the Geo location database to get the location/country based on the IP address. The geo location database is available with many geo location providers. Either we can run that instance in our own server or call the geo location provider API to get the location details.

Note: All the Geolocation providers get the location details based on the IP address. So if the user if spoofing his IP address, then we might get a different location.

Although there are many geo location providers in the market, in this example we will consider the ip2location.com API to get the geolocation. ip2location.com provides a free plan as well with limited credits of 5k queries. If you think you might send more requests then check their pricing and get a suitable plan for you.

Steps

1. Getting the client IP address.

Use the below code to get the client IP address. i.e., the IP address of the machine which requested a page in your website.

String UserIP = HttpContext.Current.Request.ServerVariables["HTTP_X_FORWARDED_FOR"];
if (string.IsNullOrEmpty(UserIP))
{
    UserIP = HttpContext.Current.Request.ServerVariables["REMOTE_ADDR"];
}

2. Calling the Geo IP Service/API

Below is the format we need to use for the API URL.

https://api.ip2location.com/v2/?ip={IP_address}&key=demo&package=WS2&addon=continent

key –> this is the secret access key provided by ip2Location when we signup with them for an account (both free and premium). They also provide a demo key with limit of 20 requests per day, hence I used it in this example.

For example, if we like to get the location details with IP address then we could use the API URL as 'https://api.ip2location.com/v2/?ip=49.206.33.84&key=demo&package=WS2&addon=continent'

string url = "https://api.ip2location.com/v2/?ip=" + UserIP.ToString() + "&key=" + AccessKey.ToString() + "&package=WS2&addon=continent";
WebClient client = new WebClient();
string jsonstring = client.DownloadString(url);

3. Reading the Geo location details from the response.

To get the sample response format, run this "https://api.ip2location.com/v2/?ip=2607:f1c0:100f:f000::2f4&key=demo&package=WS2&addon=continent,country" (replace 'demo' with access key) URL directly in the browser. You will see the below response format.

{"country_code":"US","country_name":"United States of America","isp":"1&1 IONOS Inc.","credits_consumed":5,"continent":{"name":"North America","code":"NA","hemisphere":["north","west"],"translations":[]},"country":{"name":"United States of America","alpha3_code":"USA","numeric_code":"840","demonym":"Americans","flag":"https:\/\/cdn.ip2location.com\/assets\/img\/flags\/us.png","capital":"Washington, D.C.","total_area":"9826675","population":"326766748","currency":{"code":"USD","name":"United States Dollar","symbol":"$"},"language":{"code":"EN","name":"English"},"idd_code":"1","tld":"us","translations":[]}}

I have used the Advanced REST client to make the GET request, but instead you can even directly try it from browser.
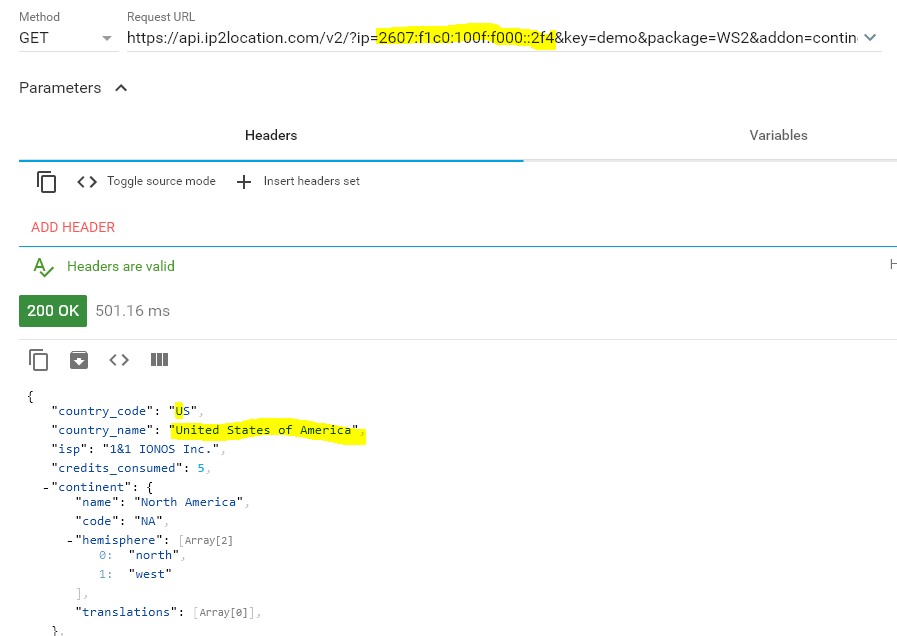
Getting location details using geoip

Use the below code to convert the response to JSON object and then read the values of JSON object and save to a session variable or some other variable.

dynamic dynObj = JsonConvert.DeserializeObject(jsonstring);
System.Web.HttpContext.Current.Session["LocId"] = dynObj.country_code;

Final Code

String AccessKey = "";
String UserIP = HttpContext.Current.Request.ServerVariables["HTTP_X_FORWARDED_FOR"];
if (string.IsNullOrEmpty(UserIP))
{
    UserIP = HttpContext.Current.Request.ServerVariables["REMOTE_ADDR"];
}

string url = "https://api.ip2location.com/v2/?ip=" + UserIP.ToString() + "&key=" + AccessKey.ToString() + "&package=WS2&addon=continent";
WebClient client = new WebClient();
string jsonstring = client.DownloadString(url);
dynamic dynObj = JsonConvert.DeserializeObject(jsonstring);
System.Web.HttpContext.Current.Session["UserCountryCode"] = dynObj.country_code;
Friday, March 12, 2021

How to create new page in Sitecore

 This post is helpful for beginners in Sitecore development. This tutorial helps creating pages in Sitecore from the scratch involving custom layouts, templates, renderings, content items with presentation details.

I. Visual studio project setup

  1. To setup a Visual Studio project for Sitecore go through the link – Integrating Visual Studio solution with Sitecore MVC

  2. Adding Glassmapper ORM: Glassmapper is an ORM to access the Sitecore items as class objects/models. Install Glassmapper to the Visual studio project by adding the Glass.Mapper.Sc from nuget package manager.

II. Layout creation

Create a layout file in visual studio. i.e., create a .cshtml file inside the Views/Shared folder with name _Layout.cshtml and with the below content.

@using Sitecore.Mvc
<!DOCTYPE html>
<html>
<head>
    <title>Demo 1</title>
    <link href="~/Content/Styles.css" rel="stylesheet" />
</head>
<body>
    <div class="root">
        <div class="header-content">
            @Html.Sitecore().Placeholder("phHeader")
        </div>

        <div class="body-content">
            @Html.Sitecore().Placeholder("phContent")
        </div>

        <div class="footer-content">
            @Html.Sitecore().Placeholder("phFooter")
        </div>
    </div>
</body>
</html>

Create a layout item in Sitecore

  1. Go to Content editor in Sitecore

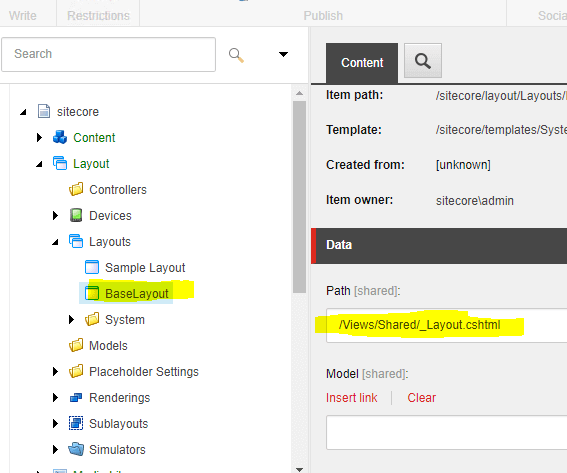
  2. Right click on Layouts (/sitecore/layout/Layouts) item, click ‘insert’ and select ‘Layout’ to create a new Layout. Name it as BaseLayout

  3. Provide the Path value for the new layout. Path: /Views/Shared/_Layout.cshtml

    Image Text

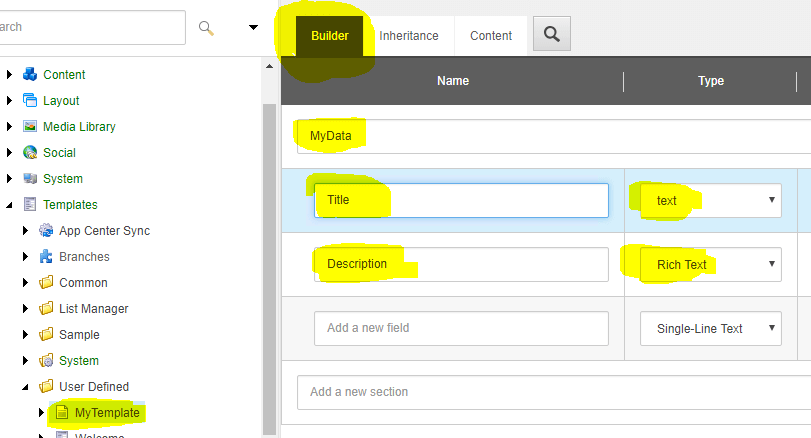
III. Template creation

Create a new template in Sitecore

  1. Right click on Templates (/sitecore/templates/) item, click on insert and select ‘New template’
  2. Give some name as ‘MyTemplate’
  3. Give the Base Template as ‘Templates/System/Templates/Standard template’, which is the default value.
  4. Select the Location as ‘User Defined’.
  5. Add a section name and create two new fields as shown below.Image Text

IV. Renderings creation

Create Controller renderings in Sitecore

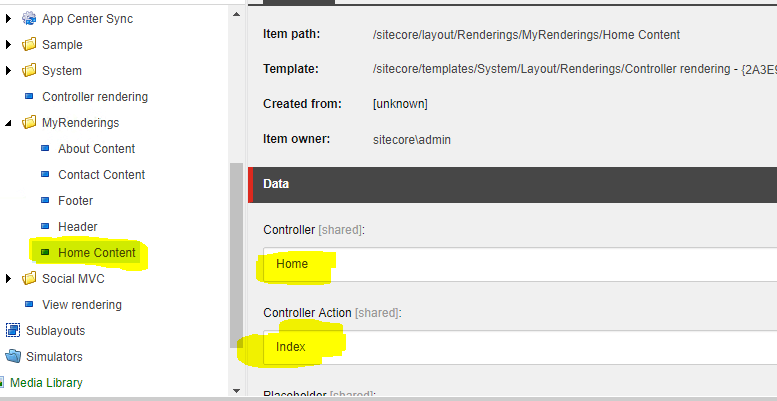
  1. Right click on the Renderings item, click insert and select Controller rendering. Name it as Home Content

  2. Give the Controller and Controller Action field values as below

    Controller: Home

    Controller Action: Index

    Image Text

  3. Similarly create another four Controller renderings in Sitecore by following the above steps but with different names and values as below.

  • Rendering Name: About Content, Controller: Home, Controller Action: About

  • Rendering Name: Contact Content, Controller: Home, Controller Action: Contact

    • Rendering Name: Header, Controller: Home, Controller Action: Header

    • Rendering Name: Footer, Controller: Home, Controller Action: Footer

V. Pages creation

Lets create some simple pages in visual studio – Home page, About page, Contact page

  1. Go to the Visual studio and create a Controller ‘Home’ with below action methods.

    • Index
    • Header
    • Footer
    • About
    • Contact
  2. Below is the code snippet for the same.

     using System;
     using System.Collections.Generic;
     using System.Linq;
     using System.Web;
     using System.Web.Mvc;
     using Glass.Mapper.Sc;
    
     namespace SitecoreApp.Controllers
     {
         public class HomeController : Controller
         {
             public ActionResult Index()
             {
                 var context = new SitecoreContext();
                 var viewModel = context.GetCurrentItem<MyTemplate>();
                 return View(viewModel);
             }
             public ActionResult Header()
             {
                 return View();
             }
             public ActionResult Footer()
             {
                 return View();
             }
             public ActionResult About()
             {
                 var context = new SitecoreContext();
                 var viewModel = context.GetCurrentItem<MyTemplate>();
                 return View(viewModel);
             }
             public ActionResult Contact()
             {
                 var context = new SitecoreContext();
                 var viewModel = context.GetCurrentItem<MyTemplate>();
                 return View(viewModel);
             }
         }
     }
    

    Model - MyTemplate.cs

     using Glass.Mapper.Sc.Configuration.Attributes;
     using System;
    
     namespace SitecoreApp.Models
     {
         public class MyTemplate
         {
             [SitecoreId]
             public virtual Guid Id { get; set; }
    
             [SitecoreField]
             public virtual string Title { get; set; }
    
             [SitecoreField]
             public virtual string Description { get; set; }
         }
     }
    
  3. For the above created action methods, create respective views with simple content as shown below.

    Index.cshtml

     @inherits Glass.Mapper.Sc.Web.Mvc.GlassView<SitecoreApp.Models.MyTemplate>
     <h2>@Model.Title</h2>
     <div>@Html.Raw(Model.Description)</div>
    

    Header.cshtml

     <h2>Header</h2>
    

    Footer.cshtml

      <h2>Footer</h2>
    

    Contact.cshtml

     @inherits Glass.Mapper.Sc.Web.Mvc.GlassView<SitecoreApp.Models.MyTemplate>
     <h2>@Model.Title</h2>
     <div>@Html.Raw(Model.Description)</div>
    

    About.cshtml

     @inherits Glass.Mapper.Sc.Web.Mvc.GlassView<SitecoreApp.Models.MyTemplate>
     <h2>@Model.Title</h2>
     <div>@Html.Raw(Model.Description)</div>
    

Create Content items in Sitecore for each of these pages

  1. Right click on the Home item, click insert and select ‘Insert from Template’.

  2. Select the Template as /User Defined/MyTemplate.

  3. Name the item as ‘About.

  4. Give some ‘Title’ and ‘Description’ for the page

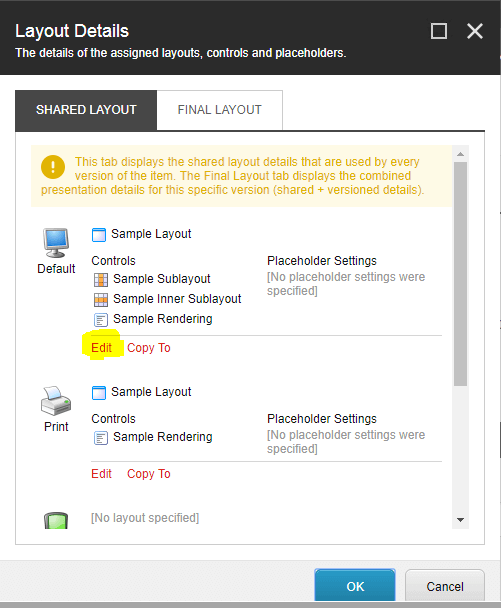
  5. Select the About item. Go to the Presentation tab at the top and click on ‘Details’. Edit the Default layout.

    Image Text

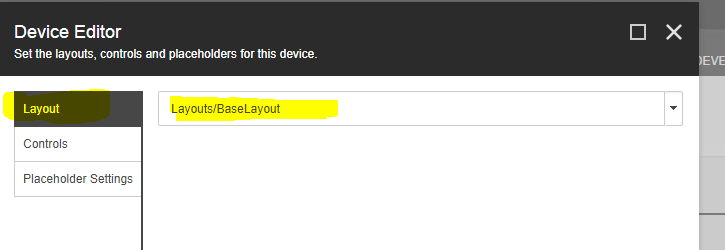
  6. Add the layout as shown below.

    Image Text

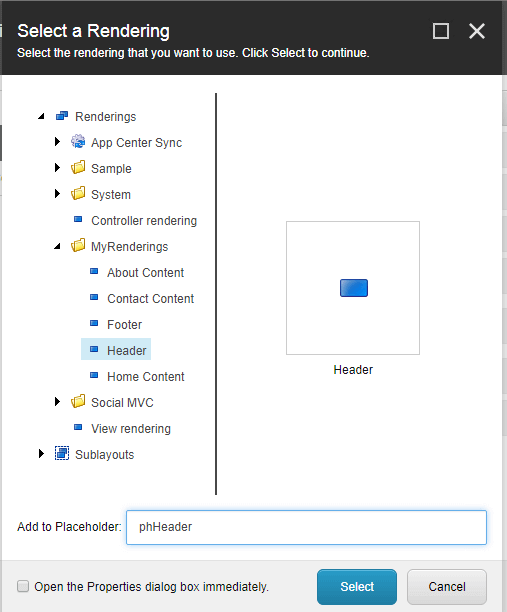
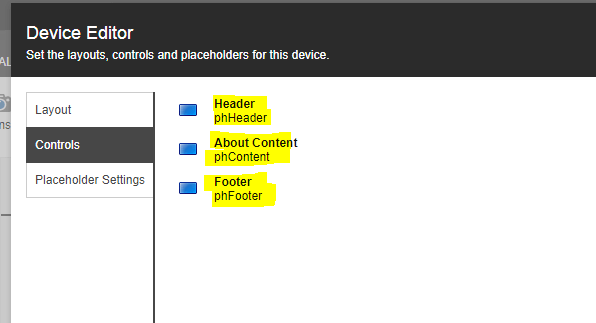
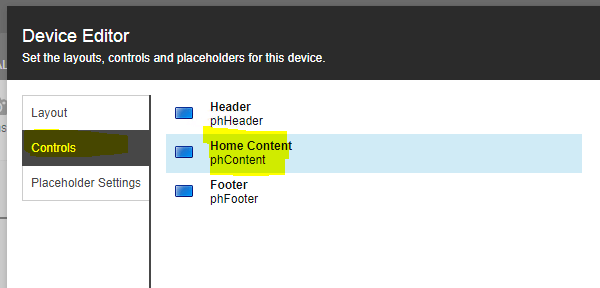
  7. Add the below renderings with respective placeholders

    • Header
    • About
    • Footer

    Image Text

    Image Text

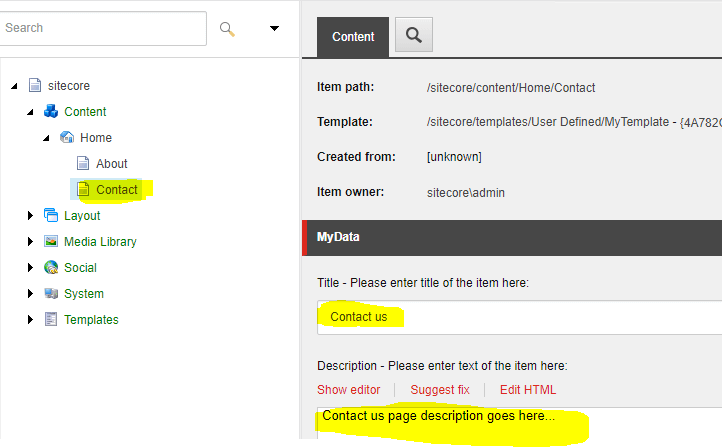
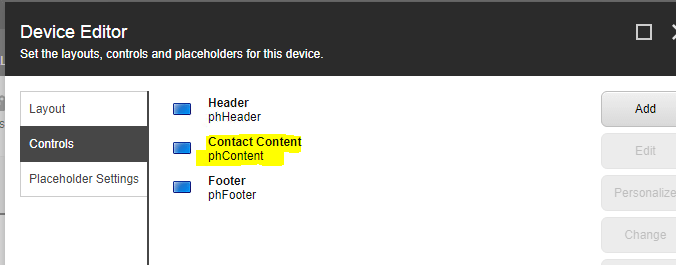
  8. With this, we have completed the creation of About page. Similarly create another item Contact and assign the renderings respectively as shown below.

    Image Text

    Image Text

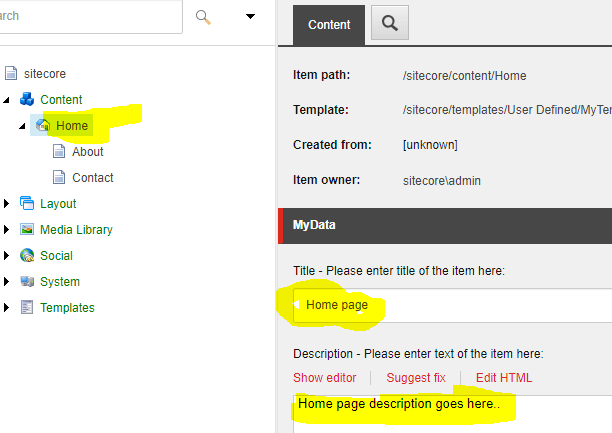
  9. Similarly, edit the Home item’s presentation details as below.

    Image Text

    Image Text

VI. Publishing and testing

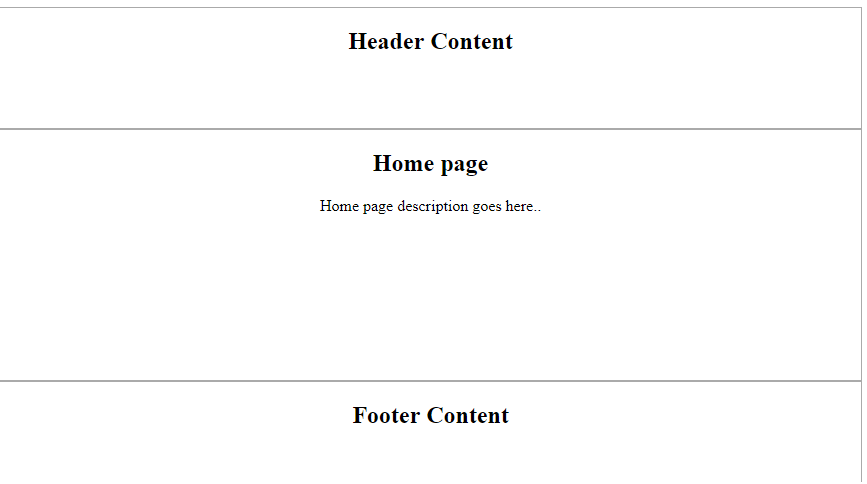
  1. Republish the website and the browse the pages using the below URLs

    Home page – http://instancename/Home

    About page – http://instancename/About

    Contact page – http://instancename/Contact

    Image Text

    Image Text

    Image Text