Almost near to the end of a major Sitecore as well as infrastructure upgrade from Sitecore version 7.2 to 9.0.2. Thought of penning my upgrade story which becomes more spicier with lots of mysterious twists by having xConnect in the lead role.
Just like all my previous Sitecore upgrades this was almost similar apart from adding Sitecore Official Nuget, CI/CD using Octopus and most importantly the tedious patch up between xConnect and the client certificates issued by organizational authorities. Using Sitecore official Nuget for latest assembly references and Express migration tool for Database migration, the upgrade was a bit smoother without any critical errors/hiccups. But when we were at the stage to test the complete ecosystem in XP9 platform from hitting the website and generating the related reporting graph on the Experience Analytics Dashboard, resolving the issues with xConnect and non-self-signed Client Certificates was such a bumpy ride.
We faced a lot of issues and it was troublesome to find root cause behind the incompatibility between xConnect and Client Certificates. I also get a chance to chat with some of my Sitecore community friends over Slack and almost everyone who implemented Sitecore 9 for the very first time, sailed the same boat. Though as always I found a lot of excellent blogs and questions on SSE with similar problem and relevant answers. But for us the culprit was something else but not Certificates hence thought of blogging a consolidated post with all the issues we faced and our approach towards Nirvana!!!
So we have a scaled Sitecore 9.0.2 environment with
- One Instance for combined Content Management, Processing and Reporting Roles
- Scaled Instances for each the xConnect roles
- xConnect Collection
- xConnect Collection Search
- xDb Reference Data
- Marketing Automation Operation
- Marketing Automation Reporting
- Two Load balanced Instances for Content Delivery Roles
- Two Solr Instances – Master and Slave
- Two SQL Server Instances
Please have a look at the Sitecore Network Topology Diagram. The CM and few of the databases were on the corporate (internal) network whereas the xConnect, Solr, SQL and the CD Roles were on DMZ behind F5.

Following are the series of exceptions we faced one after another when we were applying the fixes during our research and debugging.
Series of Incompatibility Exceptions
Invalid Certificate
FATAL [Experience Analytics]: Failed to synchronize segments. Message: Ensure definition type did not complete successfully. StatusCode: 401, ReasonPhrase: 'Invalid certificate', Version: 1.1, Content: System.Net.Http.StreamContent, Headers:
Forbidden Access
FATAL [Experience Analytics]: Failed to synchronize segments. Message: Ensure definition type did not complete successfully. StatusCode: 403, ReasonPhrase: 'Forbidden', Version: 1.1, Content: System.Net.Http.StreamContent, Headers:
Unauthorized Access
An unhandled exception of type 'Sitecore.XConnect.XdbCollectionUnavailableException' occurred in mscorlib.dll The HTTP response was not successful: Unauthorized
xDB Unavailable with Time Out Exception
Exception: Sitecore.XConnect.XdbCollectionUnavailableException
Message: An error occurred while sending the request.
Source: Sitecore.Xdb.Common.Web
at Sitecore.Xdb.Common.Web.Synchronous.SynchronousExtensions.SuspendContextLock[TResult](Func`1 taskFactory)
at Sitecore.XConnect.Client.XConnectSynchronousExtensions.SuspendContextLock(Func`1 taskFactory)
at Sitecore.XConnect.Client.Configuration.SitecoreXConnectClientConfiguration.Initialize(XmlNode configNode)
at Sitecore.Configuration.DefaultFactory.CreateObject(XmlNode configNode, String[] parameters, Boolean assert, IFactoryHelper helper)
at Sitecore.Configuration.DefaultFactory.CreateObject(XmlNode configNode, String[] parameters, Boolean assert)
at Sitecore.Configuration.DefaultFactory.CreateObject(String configPath, String[] parameters, Boolean assert)
at Sitecore.XConnect.Client.Configuration.SitecoreXConnectClientConfiguration.GetClient(String clientConfigPath)
at Sitecore.PathAnalyzer.Processing.Agents.TreeAggregatorAgent.Execute()   at Sitecore.Analytics.Core.BackgroundService.Run()

Exception: Sitecore.Xdb.Common.Web.ConnectionTimeoutException
Message: A task was canceled.Source: Sitecore.Xdb.Common.Web
at Sitecore.Xdb.Common.Web.CommonWebApiClient`1.<ExecuteAsync>d__37.MoveNext()
--- End of stack trace from previous location where exception was thrown ---
at System.Runtime.ExceptionServices.ExceptionDispatchInfo.Throw()
at System.Runtime.CompilerServices.TaskAwaiter.HandleNonSuccessAndDebuggerNotification(Task task)
at Sitecore.Xdb.Common.Web.CommonWebApiClient`1.<ExecuteGetAsync>d__32.MoveNext()
--- End of stack trace from previous location where exception was thrown ---
at System.Runtime.ExceptionServices.ExceptionDispatchInfo.Throw()
at System.Runtime.CompilerServices.TaskAwaiter.HandleNonSuccessAndDebuggerNotification(Task task)
at Sitecore.XConnect.Client.WebApi.ConfigurationWebApiClient.<Refresh>d__4.MoveNext()
Could not create SSL/TLS secure channel
System.Net.WebException: The request was aborted: Could not create SSL/TLS secure channel
So we tried multiple solutions to establish the connection between xConnect and other roles, especially with CM while we were trying to generate the graphs on the Experience Analytics Dashboard. Though I will try my best to elaborate the approach of our debugging and research, but if you have any questions please free to drop a comment on this blog or reach out/DM me on slack or social channels.
Probable Root Causes of Certificate Incompatibility:
At the very beginning we had the Invalid Certificate exception on both CM as well as CD role, hence the traffic on CD was not even being recorded in the Shard databases. We did some research and found following suggestions on few blogs and SSE about the known root causes behind certificate incompatibilities with xConnect:
Note: This question on Sitecore Stack Exchange was the source of all the possible root cause analysis mentioned below.
Certificate not installed or Thumbprint missing/incorrect
There are possibilities that either the certificates are not installed on server/client or the thumbprint is missing/incorrect in the required configuration files.
Result: We verified multiple times and everything was perfect with this aspect.
Untrusted certificates in ‘Trusted Root Certification Authorities’
This PowerShell command will identify non-self-signed certificates:
Get-Childitem cert:\LocalMachine\root -Recurse | Where-Object {$_.Issuer -ne $_.Subject}
Move these non-self-signed certificates into the Intermediate Certification Authorities (i.e. CA) store
Get-Childitem cert:\LocalMachine\root -Recurse | Where-Object {$_.Issuer -ne $_.Subject} | Move-Item -Destination Cert:\LocalMachine\CA
Result: We had NO untrusted certificates in the trusted root authorities, hence this was not our case as well.
SQL Script Execution as Post Installation Step
Once the vanilla installation is done as Post Installation Steps we need to execute a SQL script which grants required permissions to collectionuser on the Shard Databases.
Result: We are on version 9.0.2 and the post installation script was for initial release only, I guess they fixed it for the later releases and the permissions are now granted during the installation itself. Though we verified on the database level, the collectionuser had all the permissions mentioned in the SQL script.
Invalid SSL Certificate on IIS Level
Verify if a valid Server certificate is not assigned in IIS to the respective instances.
Result: Valid SSL certificate is installed and assigned on all the IIS Instances.
SSL Setting in IIS accepts the Client Certificates
Verify the SSL Setting in IIS is configured to Accept the Client certificates for all the xConnect instances.
Result: It was already selected as ACCEPT.
Application doesn’t have access to the certificate
Make sure the Network Service, IIS User and App Pool have full access to the respective client certificate.
Result: We provided all the required access to the certificates.
No luck so far, we cross verified all the reasons mentioned above and problem still persists. Hence we decided to dig deeper.
Further Troubleshooting:
Since we verified almost everything related to certificates hence we decided to troubleshoot other areas of the topology.
Enabled to Allow Invalid Client Certificates:
We decided to give it a shot by allowing invalid certificates.
- Set AllowInvalidClientCertificates to true in web.config on CM and CD Roles.
- Set AllowInvalidClientCertificates to true in appsetting.config on xConnect Roles.
- Comment out the validateCertificateThumbprint in appsetting.config on xConnect Roles.
- Reset the app pools and give it a shot.
Result: Surprisingly the errors were gone by allowing the invalid certificates and we had cleaner log files. Then we generated some traffic and guess what, the data populated in the Shard DBs. For testing we reduced the Session Time Out on CDs to 2 minutes. After couple on minutes data populated in Reporting Database and we see the reports on the Analytics Dashboard. Looks like the entire cycle is up and running now. BUT WHY, WHAT ARE WE MISSING WITH CERTIFICATES?

Now we are confirmed that there is something definitely wrong either with the certificates or any related configuration which is not allowing the communication to take place via SSL.
Pro tip: In such disastrous situation make sure the Server Technologist or Info Sec person is your friend and I find myself very lucky here. 
So we reverted everything back to the previous state to disallow invalid certificates. And the 401: Invalid Certificates exceptions are back. Worked closely with the security team and here are the steps we followed for further debugging:
Allowed Direct Traffic bypassing the F5:
If you have a look at the topology diagram above the xConnect and CD instances are behind F5 whereas the CM is not cause it is on an internal network. Hence to avoid the possibilities of something misconfigured at F5 level, we removed the SSL profiles from the VIP. But this was not sufficient to resolve the issue therefore we temporarily allowed a bypass of the F5 altogether by putting in a temporary firewall rule to allow CM and xConnect to communicate directly.
When we configured this the 401: Invalid Certificate exceptions were gone. And we start getting the Exception #3 above regarding Unauthorized Access.
Obviously we can’t bypass the F5 as a permanent fix hence re-visited the configurations on F5. Later we figured out that the HTTP Profile on the VIP was selected as HTTP. We changed the HTTP Profile on the VIP from “HTTP” to “None”and removed the temp firewall rule to make sure everything is kosher from a firewall perspective.
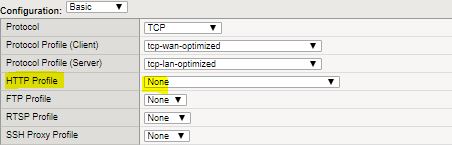
Important: HTTP profiles are incompatible with encrypted pass-through traffic, such as Secure Sockets Layer (SSL), and require a Client SSL profile to decrypt the traffic for L7 HTTP inspection. If the virtual server processing the encrypted traffic is configured with an HTTP profile and no Client SSL profile, the connection will fail.
Certification Revocation List was the next Culprit:
In our case since the xConnect boxes are in DMZ behind F5 and the URL for the Distribution Point Name for the CRL check was internal. But the traffic from external network to internal network was blocked. Due to this the CRL Check was not taking place and we were getting the Could not create SSL/TLS secure channel exception. If you face the similar issues, visit the CRL Distribution Points on your certificates.
CRL Distribution Point
     Distribution Point Name:
          Full Name:
As a temporary solution we decided to disable the CRL check for the certificates. To achieve this we added a registry entry DefaultSslCertCheckMode at HKLM\SYSTEM\CurrentControlSet\Services\HTTP\Parameters\SslBindingInfo for every Role which need client certificate authentication i.e. all the xConnect Roles. Please have a look at this wonderful blog about how to Disable Client Certificate Revocation List Check on IIS.
Note: Though as a permanent fix the security team is revisiting the current configuration they have for the CRL checks. Once that is fixed we will be enabling the CRL Check again on IIS.
VOILA!!! Everything was up and running using the same set of certificates. No exceptions in logs and latest data on the Analytics Dashboard. The Ultimate Nirvana!!!

Conclusion:
Every problem is an opportunity to learn something new. For us reason behind the incompatibility between xConnect and Certificates was NOT Certificates but the F5 and CRL Check. Hence when you are having fun with xConnect for the very first time make sure to inspect every single aspect of your entire topology. Good Luck!!!


