Tuesday, October 13, 2020

Sitecore custom security roles and permissions

 This post focuses on creating custom Sitecore roles and permissions with separate roles for authors and reviewers in a Multisite instance.

Scenario: Consider an instance with multiple sites (site1, site2, site3 etc..). With multiple sites, we may need to have separate authors and reviewers for each Site.

For example, Site1 may need the roles -> Site1 author, Site1 reviewer. Similarly for Site2 may need -> Site2 author, Site2 reviewer

Steps to create

To implement custom roles and permissions for a multi site instance, we need the following roles to be created.

  • Base role for each Site
  • Author role
  • Review role
  • Workflow

Base Role

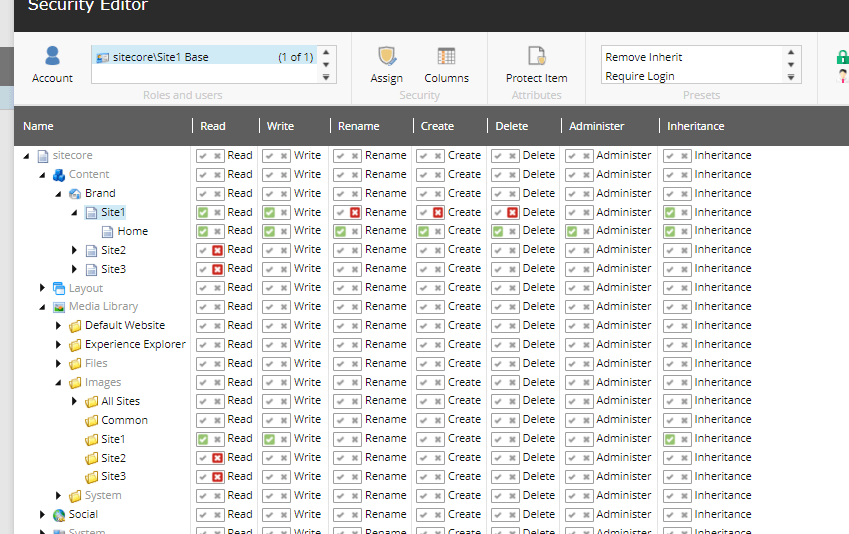
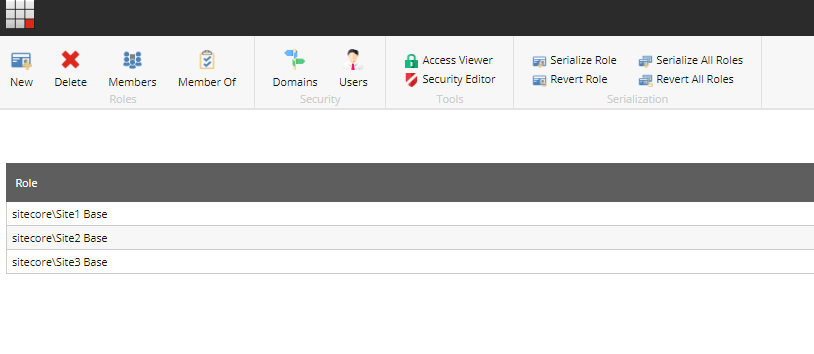
The sole purpose of a base role is to restrict the access to each individual site with required read and write permissions. Consider a site named 'Site1', in the Sitecore. To restrict access of the users to only this site's section, the base role created is 'Site1 Base'. below is how we have granted/denied the read and write permissions.

So any user with this role 'Site1 Base' will have access only to Site1 sections. Similarly, we can create different roles for different sites like Site2 Base, Site3 Base.. etc.,

Image Text

Workflow role###

Assuming that a Workflow is used, we are having the permissions set for the workflow too. This role is to add workflow related restrictions to users based on the workflow steps.

For example, the content author might not need access to publish content to live, instead Content reviewer should be able to review and also publish content to Live. In such cases we will have the workflow restrictions added to the Content Author role.

Lets consider a sample workflow for our example.

Image Text

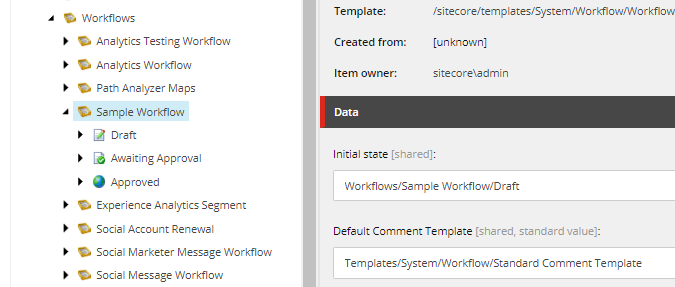
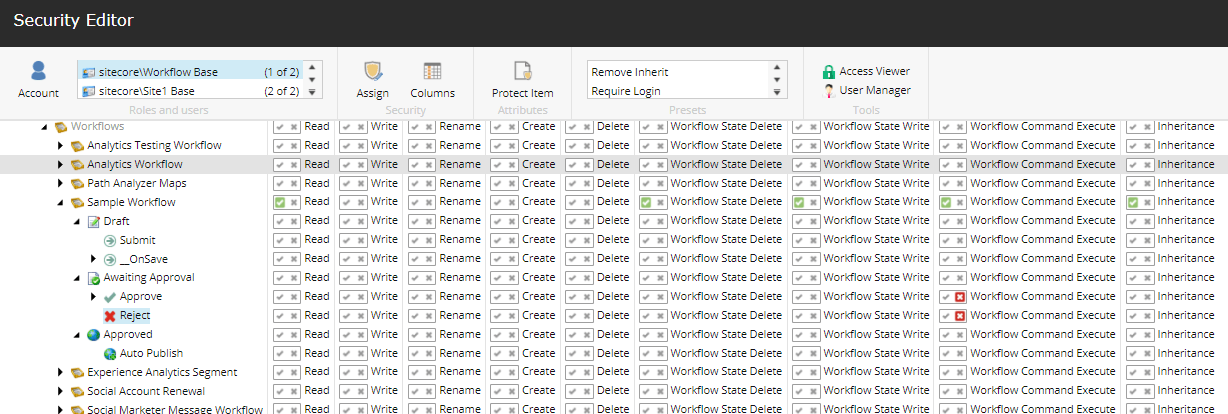
We shall create a role 'Workflow Base' and assign the permission as shown below. So any user/role with 'Workflow base' role, will not have access to approve content and hence cannot publish the content.

Image Text

Author role

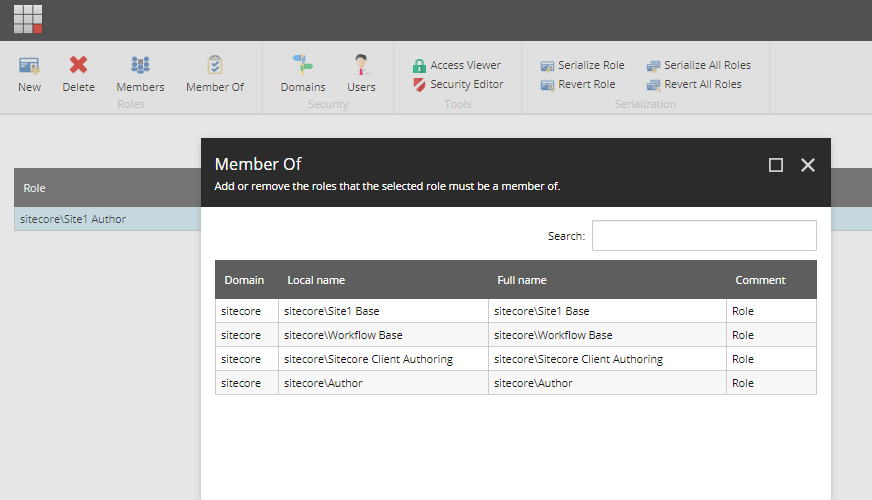
As the authors are specific to each site in the Sitecore, we shall create separate role for each site. Considering our example, we shall create a author role for Site1 as 'Site1 Author'. Create the new role 'Site1 Author' and add sub roles as shown below.

Here we have added the

  • Site1 Base -> this would restrict access to sections of Site1 only.
  • Workflow Base -> this would add workflow and publish restrictions.
  • Author, Sitecore client Authoring -> Basic Sitecore roles required for a content author.

Image Text

Reviewer role

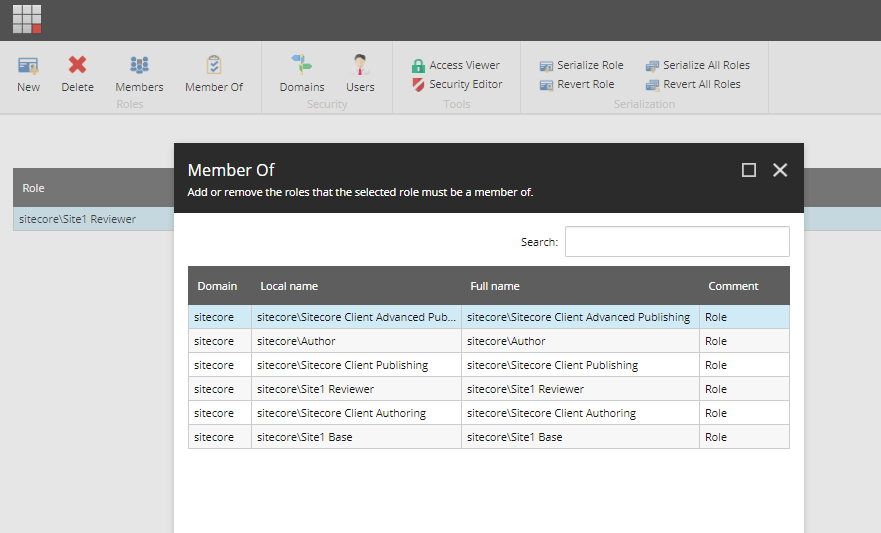
Reviewer is the one who can review/approve content and publish it. So they would need the access of an author + publishing rights and this role should be specific to each site. So create a reviewer role for Site1 as 'Site1 Reviewer' and assign sub roles as below.

  • Site1 Base
  • Author, Sitecore Client athoring
  • Sitecore Client publishing, Sitecore Client advanced publishing -> added these to have publishing rights

Note: There is no Workflow base role added to reviewer as these users should not be restricted with workflow and should have the complete publish access.

Image Text

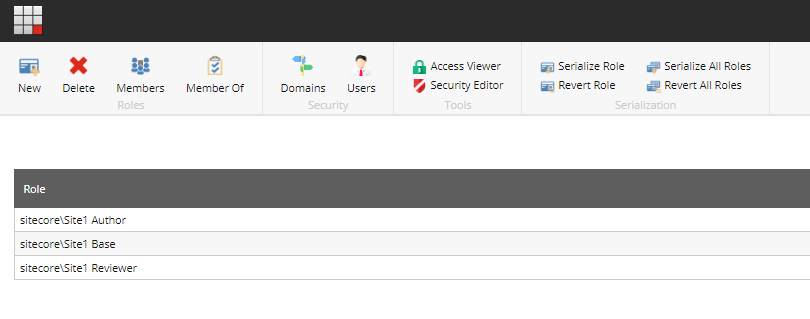
Now for each site, we will have 3 roles - Base role, Author role & Reviewer role. Below are all the roles created for Site1. The Workflow base role can be shared across the instance if all the Sites use the same Workflow.

Image Text

Similarly for another Site say 'Site2', below are the roles we would create.Image Text

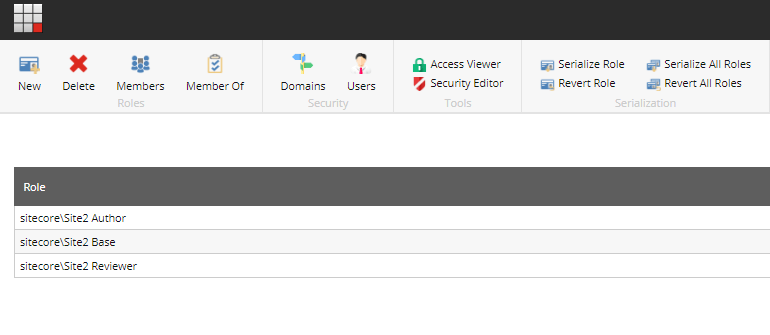
For any common permissions or roles to be assigned, across all roles/users the best place to be added is the base role. Instead of adding for each user or each role, if we add them to the base roles, they would be inherited automatically

Image Text

Multi language roles

Till now we haven't considered the language restriction on content authors. For multi site and multi language sites, there may be a case that content authors may need access only to specific languages/regions.

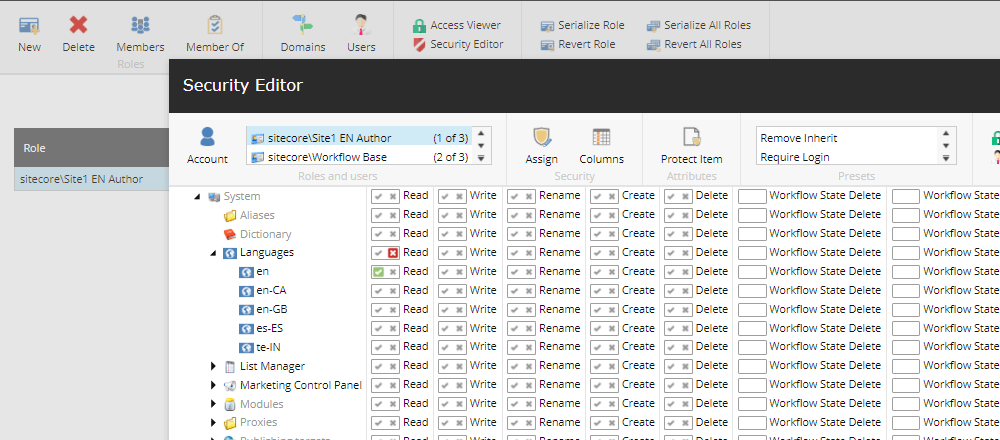
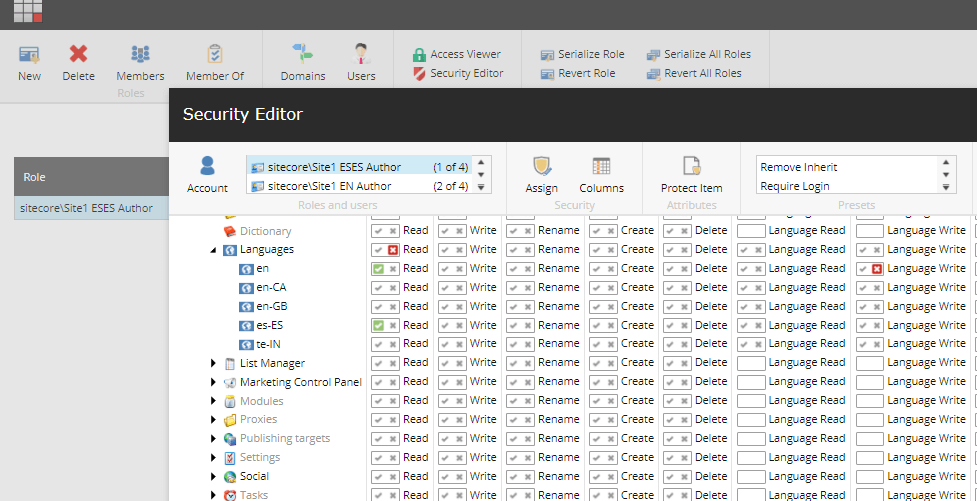
For example, in Site1 there could be 2 languages (EN & es-ES). If we need separate content author roles for each language, then we might need to create separate roles like 'Site1 EN Author', 'Site1 ESES Author'.

Below is how we differentiate based on the access to languages. Note: For non EN language authors, they might need the read only access to EN. So granted the read access to EN language but denied LanguageWrite access.

Site1 EN Author permissions

Image Text

Site1 ESES Author permissions

Image Text

Hope this helps!! Please share do your thoughts.

Monday, October 5, 2020

Scheduled and Advanced Publishing with Sitecore

 This post was originally published by Ken Gray on November 16, 2018 and was edited by Hector Chen on February 2, 2022.

Welcome to the second part of the Scheduled Publishing and Advanced Publishing with Sitecore post which is a segment in the Productivity Tips for Sitecore Content Authors and Experience Marketers article series.

In Part 1 of the Sitecore Advanced Publishing, I covered the following areas:

  • Sitecore Publishing Best Practices
  • Publishing Through Sitecore’s Workflow (Sample)
  • Manual Publishing

If you haven’t read the first part, I highly recommend reviewing the Sitecore Publishing Best Practices part of it.

In this post, I’ll be covering some caveats to publishing and removing content from a live website.

Auto-publishing vs Scheduled Publishing

Out-of-box, it appears that you can simply set the Publish date/time and Unpublish date/time, and Sitecore will automatically publish content to your live website; or remove it when the time comes. Seems reasonable and logical right? However, that is not the intended purpose for the Publish and Unpublish dates.

Think of the Publishing and Unpublishing date/time fields, as “scheduling” or “queuing” content for a future publish action. In other words, a “manual” publish still needs to be executed. 

If the current date/time falls out of the item's publishing date/time range, publishing the item will do one of the following:

  • if the publishing date has not yet been reached, publishing the item will not make it visible on the website.
  • if the item is already on the website and the unpublishing date has been reached, publishing the item will remove it from the website.

Essentially, the Publish date/time restricts and adds more assurance, that an item won’t be accidentally published before it’s time; or removes an item from the site when the Unpublish date/time has been reached.

Here are the options for automatically publishing content:

  • Download the AUTOMATED PUBLISHER module from the Sitecore Marketplace.
    • See below for instructions on how to use it.
  • Have your Sitecore implementers write your own custom code that is triggered by a Sitecore Task.
  • Schedule content items for publishing and manually perform a Site publish at specific intervals (e.g. twice a day).
    • See our post on Content Governance.
    • It’s not really automated, but a manual site publish will push and remove ALL content from the live website based on the specified publishing date range.

Unpublishing or removing content

A common mistake I see content authors make is thinking that deleting an item from the content tree also removes it from the website. This is not the case, because Sitecore uses multiple databases to manage and present content. By default, Sitecore uses the following three databases:

  1. The Master database; for all content storage and management tasks.
  2. The Web database; where only published content resides and is made visible to website visitors.
  3. The Core database; used for security and the inner workings of Sitecore along with its configuration.

Depending upon your access level you can switch between these databases and view their content tree items through the Sitecore Desktop interface.

In the lower-right-hand corner you will see the icon next to the search box which, when clicked, displays the list of available databases with the active one highlighted.

Resolving 'deleted content, but still visible on the live website' issues:

If you ever find yourself in a position where content has been deleted from the content tree, but is still displaying on your website and needs to be removed, try one or more of the following:

  • Attempt to restore the deleted item using the Sitecore Recycle Bin.
  • Publish the parent item of the one that was deleted. Sitecore will sync the Web database with the Master database, therefore removing it from the website.
  • Open the Web database and delete the item that is not required (use caution because you are editing the live website whenever you work in the Web database).

Best practice for unpublishing and deleting content:

  1. Select the item to be unpublished scroll down to the Publishing section in the Content Work Area.
  2. Click the Now option under Unpublish to set the date and time for immediate unpublishing.
  3. Save and manually publish the item to remove it from the website.
  4. If desired, Delete the item from the content tree by right-clicking the item and choosing Delete from the context menu. 

Notes:

  • If an item is deleted accidentally and still available on the site, use the Sitecore Recycle Bin to recover it.
  • If the recycle bin recovery doesn’t work, a user with sufficient privileges can recover the item by visiting the Web database and using the Control Panel to move an item to another database (namely the Master).

Restricting publishing

As mentioned previously, setting the Publish/Unpublish dates can restrict publishing depending upon where the dates fall in comparison to the current calendar date.

You can also explicitly restrict publishing on content items as follows:

  • You can set the Never Publish checkbox for an item
  • Use the Change Restrictions button on the Publishing tab; this also allows you to restrict publishing for certain versions


Lastly, you can use Sitecore Security, to remove all access rights, so the item can’t be edited or published – a bit extreme, but it works 😊

Auto Publish Module

By far, the easiest way to get true automatic publishing, is with this existing Auto Publish Module found in the Sitecore marketplace. https://marketplace.sitecore.net/en/Modules/A/Auto_Publish.aspx

This module helps in publishing and or removing items at a specific date and time. The module will, upon saving an item, check if there are any publishing restrictions set and create Scheduled Tasks for the Start Date/Time and the End Date/Time (if applicable).

By default, the module will check once per minute to see if any items, in the scheduled task list, are within the publishing window.

How to Schedule items to for Auto Publishing

  1. Select the item you want to publish. In our case we’ve create a TG Test Page.
     
  2. Click on Publish in the menu and then click Change.
  3. Change the Publishable From and Publishable To dates as appropriate and click the OK button.
  4. Click Save to record the changes to the item which sets up the Scheduled Tasks for auto publishing.
     
  5. There should now be new Tasks under the Automatic Publishing folder.

Note: If either of the dates, in Step #4, are left empty, then its related task will not be created, giving you the flexibility to either auto-publish and or auto-unpublish an item.