Thursday, December 24, 2020

Sitecore PowerShell script to get unreferenced media items

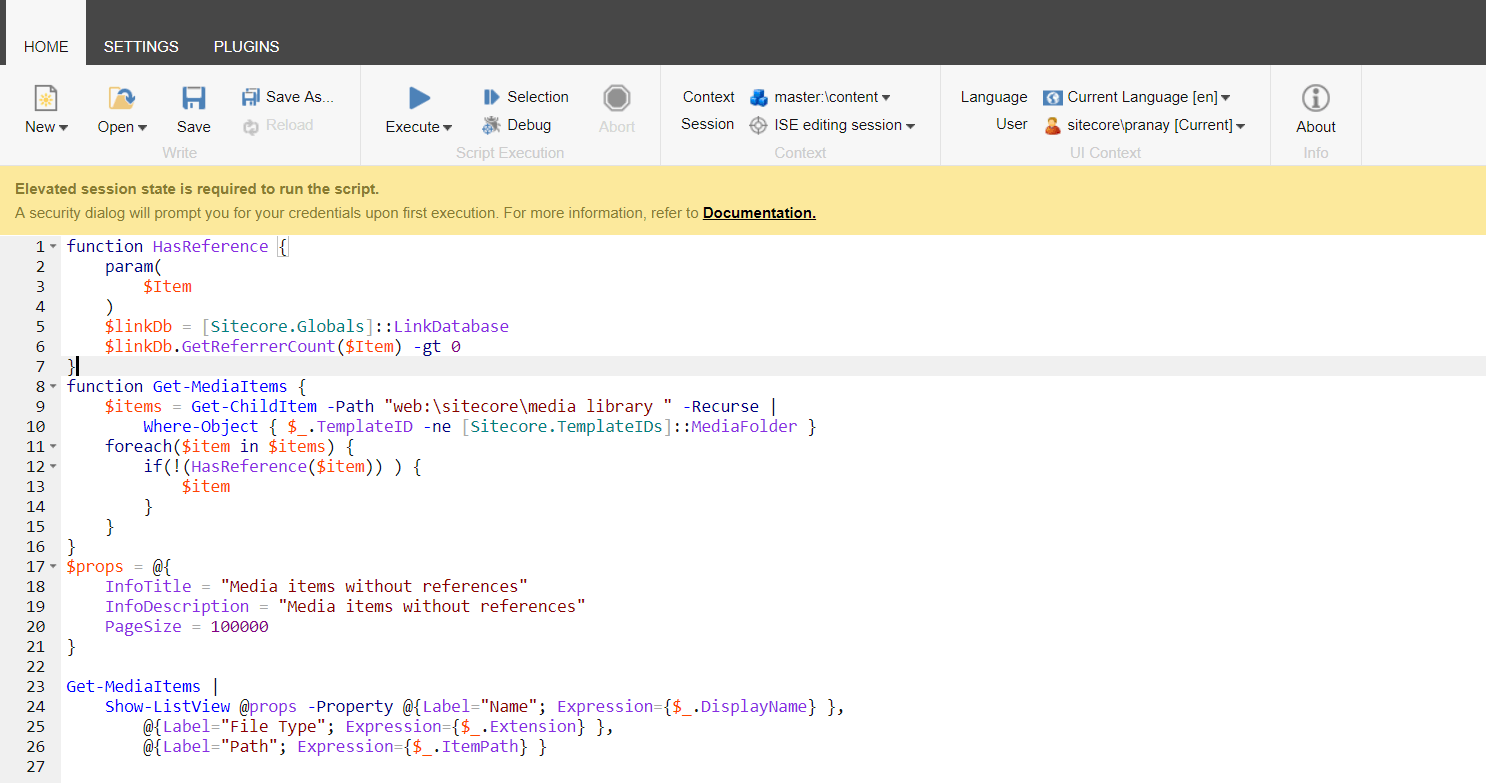
 This PowerShell script can be used to clean or list all the Sitecore media library items which are not referenced by any item in Sitecore. This can also be restricted to a sub tree within the media library by updating the source path accordingly.

To run this script it requires the Sitecore PowerShell module to be installed on your Sitecore instance.

Is this not the script you are looking for? Then check the complete list of Sitecore Powershell scripts

Image Text

Steps:

  1. Retrieve all the child items recursively from the media library root node \sitecore\media library. If you want to check only from a subtree/folder inside the media library, then update this path in the script below accordingly.
  2. For each media item, get the count of items which have references to this media item.
  3. If the count of references is zero, then consider this to be an unreferenced media item.
  4. Display all such items in a tabular format using the Show-ListView of PowerShell.

Sitecore PowerShell script to get unreferenced media items

function HasReference {
    param(
        $Item			
    )    
    $linkDb = [Sitecore.Globals]::LinkDatabase
    $linkDb.GetReferrerCount($Item) -gt 0
}
function Get-MediaItems {
    $items = Get-ChildItem -Path "web:\sitecore\media library" -Recurse | 
        Where-Object { $_.TemplateID -ne [Sitecore.TemplateIDs]::MediaFolder }
    foreach($item in $items) {
        if(!(HasReference($item)) ) {
            $item
        }
    }
}
$props = @{
    InfoTitle = "Media items without references"
    InfoDescription = "Media items without references"
    PageSize = 100000
}

Get-MediaItems |
    Show-ListView @props -Property @{Label="Name"; Expression={$_.DisplayName} },
        @{Label="File Type"; Expression={$_.Extension} },
        @{Label="Path"; Expression={$_.ItemPath} }

Monday, November 30, 2020

Incompatibilities of xConnect and Client Certificates


Almost near to the end of a major Sitecore as well as infrastructure upgrade from Sitecore version 7.2 to 9.0.2. Thought of penning my upgrade story which becomes more spicier with lots of mysterious twists by having xConnect in the lead role. 

Just like all my previous Sitecore upgrades this was almost similar apart from adding Sitecore Official Nuget, CI/CD using Octopus and most importantly the tedious patch up between xConnect and the client certificates issued by organizational authorities. Using Sitecore official Nuget for latest assembly references and Express migration tool for Database migration, the upgrade was a bit smoother without any critical errors/hiccups. But when we were at the stage to test the complete ecosystem in XP9 platform from hitting the website and generating the related reporting graph on the Experience Analytics Dashboard, resolving the issues with xConnect and non-self-signed Client Certificates was such a bumpy ride. 

We faced a lot of issues and it was troublesome to find root cause behind the incompatibility between xConnect and Client Certificates. I also get a chance to chat with some of my Sitecore community friends over Slack and almost everyone who implemented Sitecore 9 for the very first time, sailed the same boat. Though as always I found a lot of excellent blogs and questions on SSE with similar problem and relevant answers. But for us the culprit was something else but not Certificates hence thought of blogging a consolidated post with all the issues we faced and our approach towards Nirvana!!!

So we have a scaled Sitecore 9.0.2 environment with

  1. One Instance for combined Content Management, Processing and Reporting Roles
  2. Scaled Instances for each the xConnect roles
    • xConnect Collection
    • xConnect Collection Search
    • xDb Reference Data
    • Marketing Automation Operation
    • Marketing Automation Reporting
  3. Two Load balanced Instances for Content Delivery Roles
  4. Two Solr Instances – Master and Slave
  5. Two SQL Server Instances

Please have a look at the Sitecore Network Topology Diagram. The CM and few of the databases were on the corporate (internal) network whereas the xConnect, Solr, SQL and the CD Roles were on DMZ behind F5.

Topology

Following are the series of exceptions we faced one after another when we were applying the fixes during our research and debugging.


Series of Incompatibility Exceptions

Invalid Certificate

FATAL [Experience Analytics]: Failed to synchronize segments. Message: Ensure definition type did not complete successfully. StatusCode: 401, ReasonPhrase: 'Invalid certificate', Version: 1.1, Content: System.Net.Http.StreamContent, Headers: 

Forbidden Access

FATAL [Experience Analytics]: Failed to synchronize segments. Message: Ensure definition type did not complete successfully. StatusCode: 403, ReasonPhrase: 'Forbidden', Version: 1.1, Content: System.Net.Http.StreamContent, Headers: 

Unauthorized Access

An unhandled exception of type 'Sitecore.XConnect.XdbCollectionUnavailableException' occurred in mscorlib.dll The HTTP response was not successful: Unauthorized 

xDB Unavailable with Time Out Exception

Exception: Sitecore.XConnect.XdbCollectionUnavailableException
Message: An error occurred while sending the request.
Source: Sitecore.Xdb.Common.Web   
at Sitecore.Xdb.Common.Web.Synchronous.SynchronousExtensions.SuspendContextLock[TResult](Func`1 taskFactory)   
at Sitecore.XConnect.Client.XConnectSynchronousExtensions.SuspendContextLock(Func`1 taskFactory)   
at Sitecore.XConnect.Client.Configuration.SitecoreXConnectClientConfiguration.Initialize(XmlNode configNode)   
at Sitecore.Configuration.DefaultFactory.CreateObject(XmlNode configNode, String[] parameters, Boolean assert, IFactoryHelper helper)   
at Sitecore.Configuration.DefaultFactory.CreateObject(XmlNode configNode, String[] parameters, Boolean assert)   
at Sitecore.Configuration.DefaultFactory.CreateObject(String configPath, String[] parameters, Boolean assert)   
at Sitecore.XConnect.Client.Configuration.SitecoreXConnectClientConfiguration.GetClient(String clientConfigPath)   
at Sitecore.PathAnalyzer.Processing.Agents.TreeAggregatorAgent.Execute()   at Sitecore.Analytics.Core.BackgroundService.Run() 

Exception: Sitecore.Xdb.Common.Web.ConnectionTimeoutException
Message: A task was canceled.Source: Sitecore.Xdb.Common.Web   
at Sitecore.Xdb.Common.Web.CommonWebApiClient`1.<ExecuteAsync>d__37.MoveNext()
--- End of stack trace from previous location where exception was thrown ---   
at System.Runtime.ExceptionServices.ExceptionDispatchInfo.Throw()   
at System.Runtime.CompilerServices.TaskAwaiter.HandleNonSuccessAndDebuggerNotification(Task task)   
at Sitecore.Xdb.Common.Web.CommonWebApiClient`1.<ExecuteGetAsync>d__32.MoveNext()
--- End of stack trace from previous location where exception was thrown ---   
at System.Runtime.ExceptionServices.ExceptionDispatchInfo.Throw()   
at System.Runtime.CompilerServices.TaskAwaiter.HandleNonSuccessAndDebuggerNotification(Task task)   
at Sitecore.XConnect.Client.WebApi.ConfigurationWebApiClient.<Refresh>d__4.MoveNext() 

Could not create SSL/TLS secure channel

System.Net.WebException: The request was aborted: Could not create SSL/TLS secure channel

So we tried multiple solutions to establish the connection between xConnect and other roles, especially with CM while we were trying to generate the graphs on the Experience Analytics Dashboard. Though I will try my best to elaborate the approach of our debugging and research, but if you have any questions please free to drop a comment on this blog or reach out/DM me on slack or social channels.


Probable Root Causes of Certificate Incompatibility:

At the very beginning we had the Invalid Certificate exception on both CM as well as CD role, hence the traffic on CD was not even being recorded in the Shard databases. We did some research and found following suggestions on few blogs and SSE about the known root causes behind certificate incompatibilities with xConnect:

Note: This question on Sitecore Stack Exchange was the source of all the possible root cause analysis mentioned below.

Certificate not installed or Thumbprint missing/incorrect

There are possibilities that either the certificates are not installed on server/client or the thumbprint is missing/incorrect in the required configuration files.

Result: We verified multiple times and everything was perfect with this aspect.

Untrusted certificates in ‘Trusted Root Certification Authorities’

This PowerShell command will identify non-self-signed certificates:

Get-Childitem cert:\LocalMachine\root -Recurse | Where-Object {$_.Issuer -ne $_.Subject}

Move these non-self-signed certificates into the Intermediate Certification Authorities (i.e. CA) store

Get-Childitem cert:\LocalMachine\root -Recurse | Where-Object {$_.Issuer -ne $_.Subject} | Move-Item -Destination Cert:\LocalMachine\CA

Result: We had NO untrusted certificates in the trusted root authorities, hence this was not our case as well.

SQL Script Execution as Post Installation Step

Once the vanilla installation is done as Post Installation Steps we need to execute a SQL script which grants required permissions to collectionuser on the Shard Databases.

Result: We are on version 9.0.2 and the post installation script was for initial release only, I guess they fixed it for the later releases and the permissions are now granted during the installation itself. Though we verified on the database level, the collectionuser had all the permissions mentioned in the SQL script.

Invalid SSL Certificate on IIS Level

Verify if a valid Server certificate is not assigned in IIS to the respective instances.

Result: Valid SSL certificate is installed and assigned on all the IIS Instances.

SSL Setting in IIS accepts the Client Certificates

Verify the SSL Setting in IIS is configured to Accept the Client certificates for all the xConnect instances. 

Result: It was already selected as ACCEPT.

Application doesn’t have access to the certificate

Make sure the Network Service, IIS User and App Pool have full access to the respective client certificate. 

Result: We provided all the required access to the certificates.

No luck so far, we cross verified all the reasons mentioned above and problem still persists. Hence we decided to dig deeper.


Further Troubleshooting:

Since we verified almost everything related to certificates hence we decided to troubleshoot other areas of the topology.

Enabled to Allow Invalid Client Certificates:

We decided to give it a shot by allowing invalid certificates.

  1. Set AllowInvalidClientCertificates to true in web.config on CM and CD Roles.
  2. Set AllowInvalidClientCertificates to true in appsetting.config on xConnect Roles.
  3. Comment out the validateCertificateThumbprint in appsetting.config on xConnect Roles.
  4. Reset the app pools and give it a shot.

Result: Surprisingly the errors were gone by allowing the invalid certificates and we had cleaner log files. Then we generated some traffic and guess what, the data populated in the Shard DBs. For testing we reduced the Session Time Out on CDs to 2 minutes. After couple on minutes data populated in Reporting Database and we see the reports on the Analytics Dashboard. Looks like the entire cycle is up and running now. BUT WHY, WHAT ARE WE MISSING WITH CERTIFICATES?

xConnect

Now we are confirmed that there is something definitely wrong either with the certificates or any related configuration which is not allowing the communication to take place via SSL.

Pro tip: In such disastrous situation make sure the Server Technologist or Info Sec person is your friend and I find myself very lucky here. ðŸ™‚

So we reverted everything back to the previous state to disallow invalid certificates. And the 401: Invalid Certificates exceptions are back. Worked closely with the security team and here are the steps we followed for further debugging:

Allowed Direct Traffic bypassing the F5:

If you have a look at the topology diagram above the xConnect and CD instances are behind F5 whereas the CM is not cause it is on an internal network. Hence to avoid the possibilities of something misconfigured at F5 level, we removed the SSL profiles from the VIP. But this was not sufficient to resolve the issue therefore we temporarily allowed a bypass of the F5 altogether by putting in a temporary firewall rule to allow CM and xConnect to communicate directly. 

When we configured this the 401: Invalid Certificate exceptions were gone. And we start getting the Exception #3 above regarding Unauthorized Access.

Obviously we can’t bypass the F5 as a permanent fix hence re-visited the configurations on F5. Later we figured out that the HTTP Profile on the VIP was selected as HTTP. We changed the HTTP Profile on the VIP from “HTTP” to “None”and removed the temp firewall rule to make sure everything is kosher from a firewall perspective.
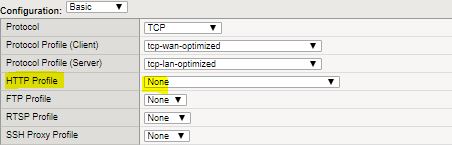
VIP

Important: HTTP profiles are incompatible with encrypted pass-through traffic, such as Secure Sockets Layer (SSL), and require a Client SSL profile to decrypt the traffic for L7 HTTP inspection. If the virtual server processing the encrypted traffic is configured with an HTTP profile and no Client SSL profile, the connection will fail.

Certification Revocation List was the next Culprit:

In our case since the xConnect boxes are in DMZ behind F5 and the URL for the Distribution Point Name for the CRL check was internal. But the traffic from external network to internal network was blocked. Due to this the CRL Check was not taking place and we were getting the Could not create SSL/TLS secure channel exception. If you face the similar issues, visit the CRL Distribution Points on your certificates.

CRL Distribution Point
     Distribution Point Name:
          Full Name:

As a temporary solution we decided to disable the CRL check for the certificates. To achieve this we added a registry entry DefaultSslCertCheckMode at HKLM\SYSTEM\CurrentControlSet\Services\HTTP\Parameters\SslBindingInfo for every Role which need client certificate authentication i.e. all the xConnect Roles. Please have a look at this wonderful blog about how to Disable Client Certificate Revocation List Check on IIS.

Note: Though as a permanent fix the security team is revisiting the current configuration they have for the CRL checks. Once that is fixed we will be enabling the CRL Check again on IIS.

VOILA!!! Everything was up and running using the same set of certificates. No exceptions in logs and latest data on the Analytics Dashboard. The Ultimate Nirvana!!!

xConnect is Working


Conclusion: 

Every problem is an opportunity to learn something new. For us reason behind the incompatibility between xConnect and Certificates was NOT Certificates but the F5 and CRL Check. Hence when you are having fun with xConnect for the very first time make sure to inspect every single aspect of your entire topology. Good Luck!!! 
Tuesday, October 13, 2020

Sitecore custom security roles and permissions

 This post focuses on creating custom Sitecore roles and permissions with separate roles for authors and reviewers in a Multisite instance.

Scenario: Consider an instance with multiple sites (site1, site2, site3 etc..). With multiple sites, we may need to have separate authors and reviewers for each Site.

For example, Site1 may need the roles -> Site1 author, Site1 reviewer. Similarly for Site2 may need -> Site2 author, Site2 reviewer

Steps to create

To implement custom roles and permissions for a multi site instance, we need the following roles to be created.

  • Base role for each Site
  • Author role
  • Review role
  • Workflow

Base Role

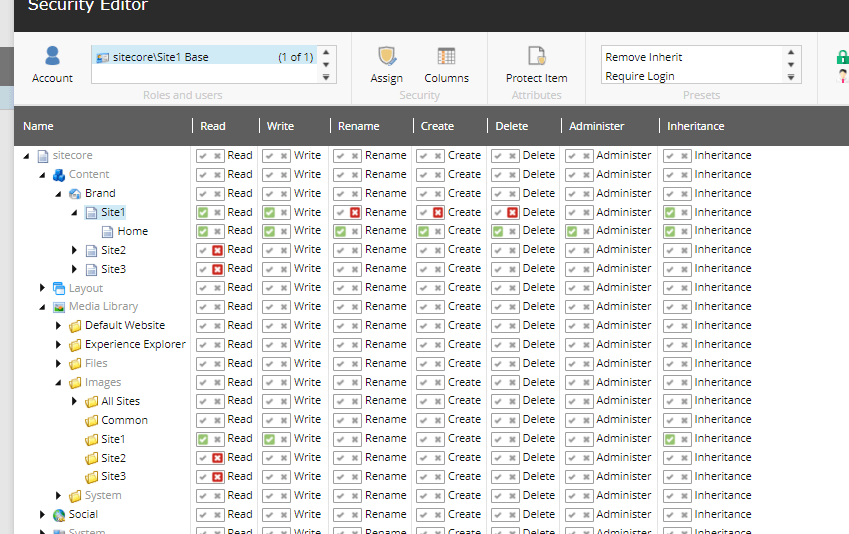
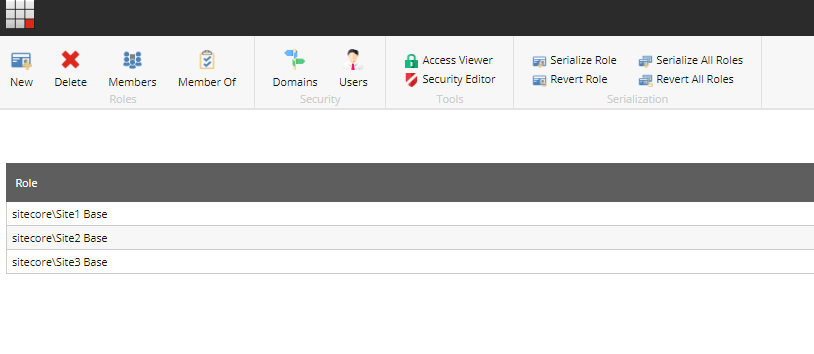
The sole purpose of a base role is to restrict the access to each individual site with required read and write permissions. Consider a site named 'Site1', in the Sitecore. To restrict access of the users to only this site's section, the base role created is 'Site1 Base'. below is how we have granted/denied the read and write permissions.

So any user with this role 'Site1 Base' will have access only to Site1 sections. Similarly, we can create different roles for different sites like Site2 Base, Site3 Base.. etc.,

Image Text

Workflow role###

Assuming that a Workflow is used, we are having the permissions set for the workflow too. This role is to add workflow related restrictions to users based on the workflow steps.

For example, the content author might not need access to publish content to live, instead Content reviewer should be able to review and also publish content to Live. In such cases we will have the workflow restrictions added to the Content Author role.

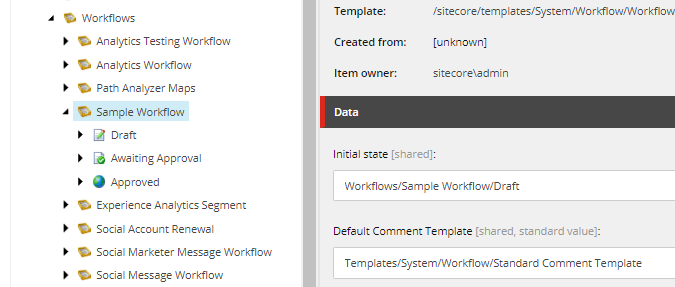
Lets consider a sample workflow for our example.

Image Text

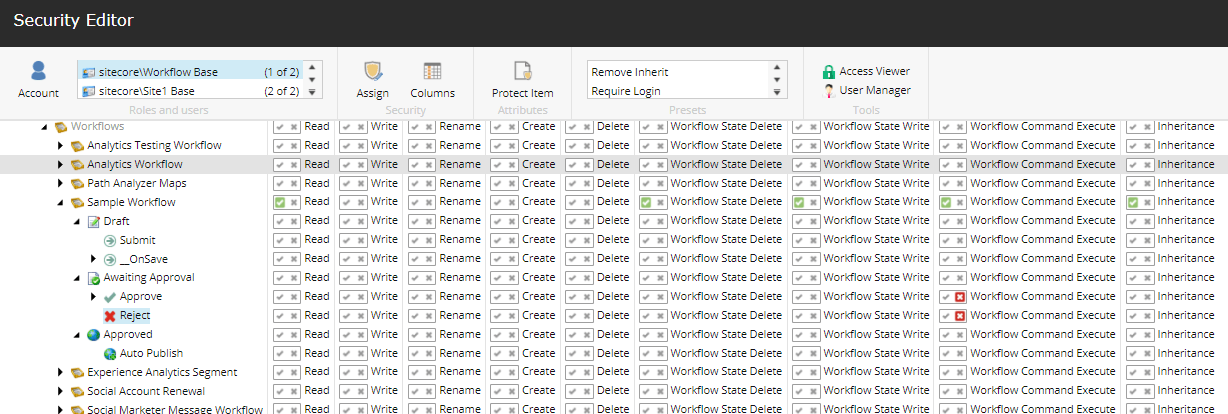
We shall create a role 'Workflow Base' and assign the permission as shown below. So any user/role with 'Workflow base' role, will not have access to approve content and hence cannot publish the content.

Image Text

Author role

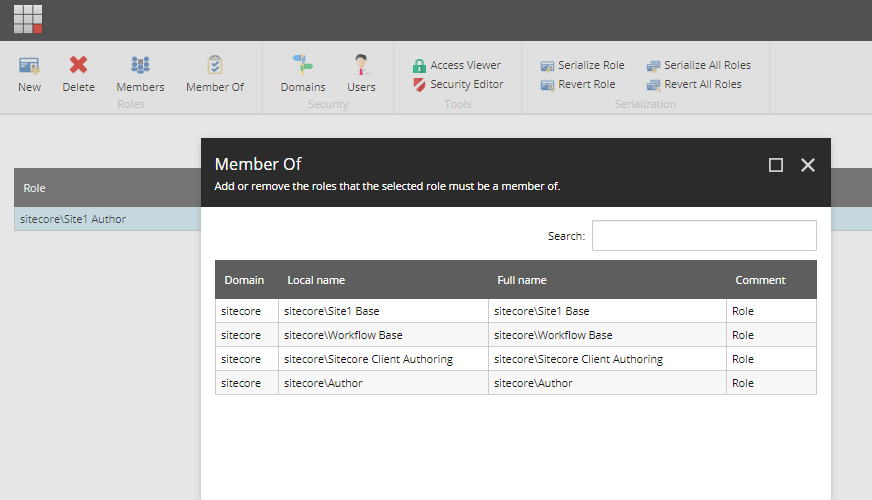
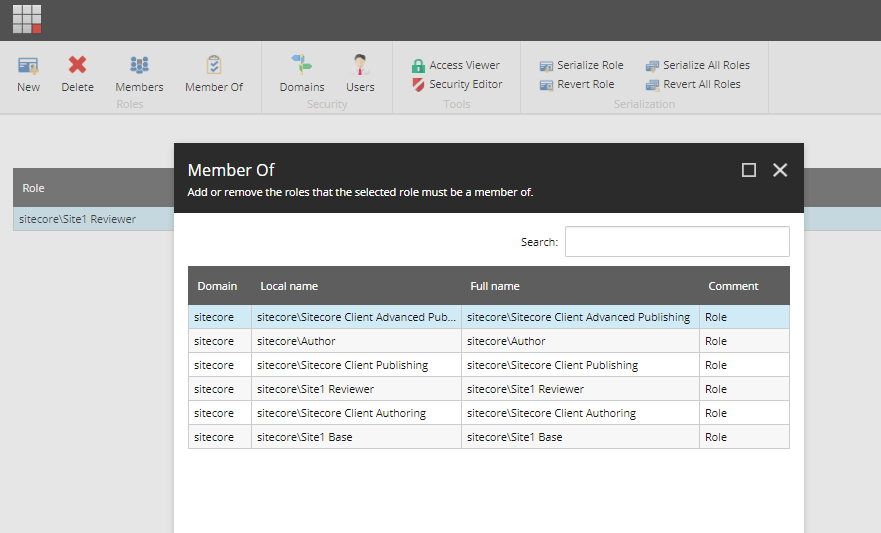
As the authors are specific to each site in the Sitecore, we shall create separate role for each site. Considering our example, we shall create a author role for Site1 as 'Site1 Author'. Create the new role 'Site1 Author' and add sub roles as shown below.

Here we have added the

  • Site1 Base -> this would restrict access to sections of Site1 only.
  • Workflow Base -> this would add workflow and publish restrictions.
  • Author, Sitecore client Authoring -> Basic Sitecore roles required for a content author.

Image Text

Reviewer role

Reviewer is the one who can review/approve content and publish it. So they would need the access of an author + publishing rights and this role should be specific to each site. So create a reviewer role for Site1 as 'Site1 Reviewer' and assign sub roles as below.

  • Site1 Base
  • Author, Sitecore Client athoring
  • Sitecore Client publishing, Sitecore Client advanced publishing -> added these to have publishing rights

Note: There is no Workflow base role added to reviewer as these users should not be restricted with workflow and should have the complete publish access.

Image Text

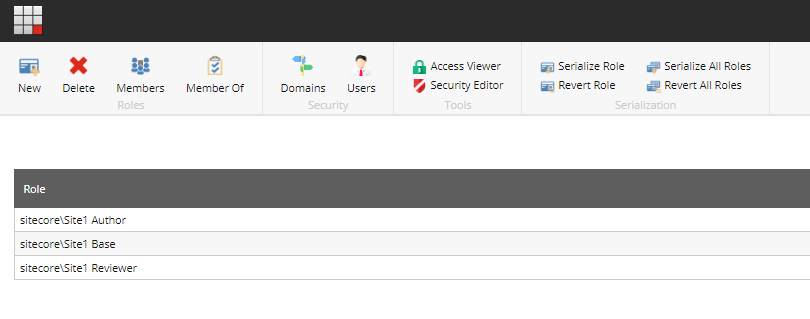
Now for each site, we will have 3 roles - Base role, Author role & Reviewer role. Below are all the roles created for Site1. The Workflow base role can be shared across the instance if all the Sites use the same Workflow.

Image Text

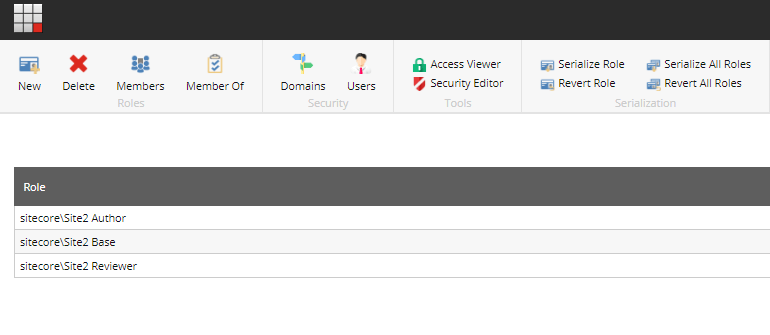
Similarly for another Site say 'Site2', below are the roles we would create.Image Text

For any common permissions or roles to be assigned, across all roles/users the best place to be added is the base role. Instead of adding for each user or each role, if we add them to the base roles, they would be inherited automatically

Image Text

Multi language roles

Till now we haven't considered the language restriction on content authors. For multi site and multi language sites, there may be a case that content authors may need access only to specific languages/regions.

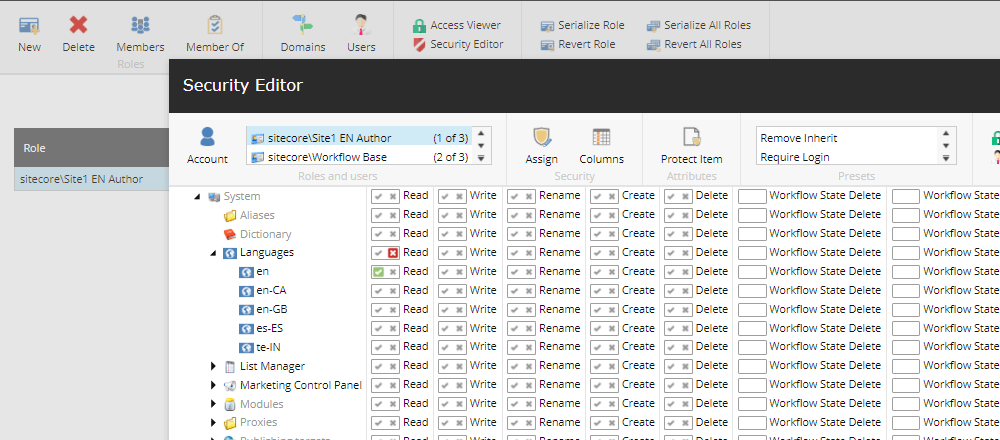
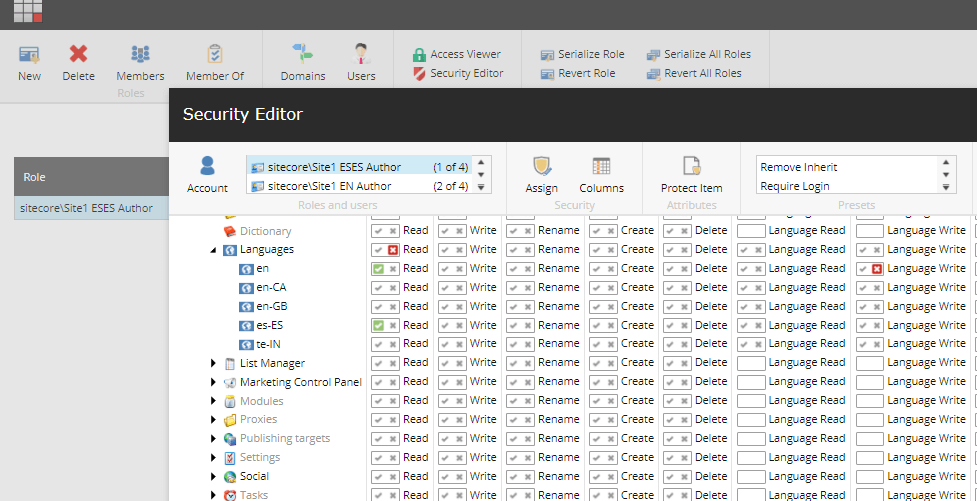
For example, in Site1 there could be 2 languages (EN & es-ES). If we need separate content author roles for each language, then we might need to create separate roles like 'Site1 EN Author', 'Site1 ESES Author'.

Below is how we differentiate based on the access to languages. Note: For non EN language authors, they might need the read only access to EN. So granted the read access to EN language but denied LanguageWrite access.

Site1 EN Author permissions

Image Text

Site1 ESES Author permissions

Image Text

Hope this helps!! Please share do your thoughts.

Monday, October 5, 2020

Scheduled and Advanced Publishing with Sitecore

 This post was originally published by Ken Gray on November 16, 2018 and was edited by Hector Chen on February 2, 2022.

Welcome to the second part of the Scheduled Publishing and Advanced Publishing with Sitecore post which is a segment in the Productivity Tips for Sitecore Content Authors and Experience Marketers article series.

In Part 1 of the Sitecore Advanced Publishing, I covered the following areas:

  • Sitecore Publishing Best Practices
  • Publishing Through Sitecore’s Workflow (Sample)
  • Manual Publishing

If you haven’t read the first part, I highly recommend reviewing the Sitecore Publishing Best Practices part of it.

In this post, I’ll be covering some caveats to publishing and removing content from a live website.

Auto-publishing vs Scheduled Publishing

Out-of-box, it appears that you can simply set the Publish date/time and Unpublish date/time, and Sitecore will automatically publish content to your live website; or remove it when the time comes. Seems reasonable and logical right? However, that is not the intended purpose for the Publish and Unpublish dates.

Think of the Publishing and Unpublishing date/time fields, as “scheduling” or “queuing” content for a future publish action. In other words, a “manual” publish still needs to be executed. 

If the current date/time falls out of the item's publishing date/time range, publishing the item will do one of the following:

  • if the publishing date has not yet been reached, publishing the item will not make it visible on the website.
  • if the item is already on the website and the unpublishing date has been reached, publishing the item will remove it from the website.

Essentially, the Publish date/time restricts and adds more assurance, that an item won’t be accidentally published before it’s time; or removes an item from the site when the Unpublish date/time has been reached.

Here are the options for automatically publishing content:

  • Download the AUTOMATED PUBLISHER module from the Sitecore Marketplace.
    • See below for instructions on how to use it.
  • Have your Sitecore implementers write your own custom code that is triggered by a Sitecore Task.
  • Schedule content items for publishing and manually perform a Site publish at specific intervals (e.g. twice a day).
    • See our post on Content Governance.
    • It’s not really automated, but a manual site publish will push and remove ALL content from the live website based on the specified publishing date range.

Unpublishing or removing content

A common mistake I see content authors make is thinking that deleting an item from the content tree also removes it from the website. This is not the case, because Sitecore uses multiple databases to manage and present content. By default, Sitecore uses the following three databases:

  1. The Master database; for all content storage and management tasks.
  2. The Web database; where only published content resides and is made visible to website visitors.
  3. The Core database; used for security and the inner workings of Sitecore along with its configuration.

Depending upon your access level you can switch between these databases and view their content tree items through the Sitecore Desktop interface.

In the lower-right-hand corner you will see the icon next to the search box which, when clicked, displays the list of available databases with the active one highlighted.

Resolving 'deleted content, but still visible on the live website' issues:

If you ever find yourself in a position where content has been deleted from the content tree, but is still displaying on your website and needs to be removed, try one or more of the following:

  • Attempt to restore the deleted item using the Sitecore Recycle Bin.
  • Publish the parent item of the one that was deleted. Sitecore will sync the Web database with the Master database, therefore removing it from the website.
  • Open the Web database and delete the item that is not required (use caution because you are editing the live website whenever you work in the Web database).

Best practice for unpublishing and deleting content:

  1. Select the item to be unpublished scroll down to the Publishing section in the Content Work Area.
  2. Click the Now option under Unpublish to set the date and time for immediate unpublishing.
  3. Save and manually publish the item to remove it from the website.
  4. If desired, Delete the item from the content tree by right-clicking the item and choosing Delete from the context menu. 

Notes:

  • If an item is deleted accidentally and still available on the site, use the Sitecore Recycle Bin to recover it.
  • If the recycle bin recovery doesn’t work, a user with sufficient privileges can recover the item by visiting the Web database and using the Control Panel to move an item to another database (namely the Master).

Restricting publishing

As mentioned previously, setting the Publish/Unpublish dates can restrict publishing depending upon where the dates fall in comparison to the current calendar date.

You can also explicitly restrict publishing on content items as follows:

  • You can set the Never Publish checkbox for an item
  • Use the Change Restrictions button on the Publishing tab; this also allows you to restrict publishing for certain versions


Lastly, you can use Sitecore Security, to remove all access rights, so the item can’t be edited or published – a bit extreme, but it works 😊

Auto Publish Module

By far, the easiest way to get true automatic publishing, is with this existing Auto Publish Module found in the Sitecore marketplace. https://marketplace.sitecore.net/en/Modules/A/Auto_Publish.aspx

This module helps in publishing and or removing items at a specific date and time. The module will, upon saving an item, check if there are any publishing restrictions set and create Scheduled Tasks for the Start Date/Time and the End Date/Time (if applicable).

By default, the module will check once per minute to see if any items, in the scheduled task list, are within the publishing window.

How to Schedule items to for Auto Publishing

  1. Select the item you want to publish. In our case we’ve create a TG Test Page.
     
  2. Click on Publish in the menu and then click Change.
  3. Change the Publishable From and Publishable To dates as appropriate and click the OK button.
  4. Click Save to record the changes to the item which sets up the Scheduled Tasks for auto publishing.
     
  5. There should now be new Tasks under the Automatic Publishing folder.

Note: If either of the dates, in Step #4, are left empty, then its related task will not be created, giving you the flexibility to either auto-publish and or auto-unpublish an item.